All Articles 

A story about multithreaded rendering | PixiEditor September Status

October 2, 2025
Hi, hello, and welcome to the September PixiEditor Status update! On today’s menu:
- Flatpak version
- New renderer and a story of great failure
- More nodes!
Let’s get to it.
Flatpak version
Flatpak is one of the package managers for Linux, which is designed to be the universal package manager for Linux software, especially GUI apps.
Up until now, PixiEditor was distributed via .tar.gz and .deb formats. It was suboptimal, as integrating PixiEditor to your Linux desktop required more effort.
Flatpak solves that issue. It automatically integrates with your desktop environment and manages updates. So if you are on Linux, give it a try!
New renderer
Due to the nature of PixiEditor, rendering is a very tricky part. Not only does Node Graph allows for arbitrary customizations, shaders and operations, PixiEditor has vector capabilities (rendering crisp vectors on small documents) and animations.
Here’s a quick comparison of new renderer with heavy animation
Old:
New:
Single threaded rendering
PixiEditor renders on the UI Thread, which means that heavy graphs can lag or even freeze the UI.
The logical solution was to make rendering on a separate thread.
Well…
My little render thread journey
In short, Render Thread is a thing that runs in the background, independently of the main app and renders graphics at it’s own pace. So whenever the main app requests a new frame, render thread grabs this request, renders and hands the frame to the main app.
And I really wish it was that simple. This will be a little technical, so if you are just interested in new features, feel free to skip it.
PixiEditor uses Vulkan and OpenGL for rendering. However, neither Vulkan nor OpenGL is “standalone”, we must first access Avalonia’s GPU context to hook our own rendering. We use Avalonia’s composition renderer to update the UI with rendered stuff.
Current renderer performs rendering “on demand”, meaning that each UI control sends a render request with its surface to draw on. It has a few benefits:
- No additional intermediate surfaces,
- Out of the box “render only what you see” approach
…and a few downsides:
- More error-prone (surfaces might get disposed mid-flight)
- Potentially rendering the same frame multiple times
- It’s harder to manage renders and perform optimizations
- It’s virtually impossible to make rendering on other thread
So the very first step was to invert the rendering logic, so we have more control over each rendered frame.
Instead of
Refresh request —> UI control surface —> Render to control’s surface
I had to do
Refresh request —> Render into intermediate surface —> UI control renders intermediate surface
Having one managing system that decides what gets rendered and in what resolution opens up a lot of optimization possibilities.
For example if you have Node Graph opened and layer’s panel visible, the renderer will render layer’s preview only once in slightly higher resolution (because node previews are bigger), instead of rendering it twice in different resolutions.
Great, so we have a system that produces bitmaps/surfaces with all previews and frames, that are just grabbed by UI controls to display. So the next logical step is to render these asynchronously.
Before I decided to jump into building separate thread solution, I tried better rendering scheduling in the Avalonia’s UI Thread dispatcher. It is still one thread, but any lags should be “spread out” over a few frames.
At first it seemed to work really great, playing animations for heavy graphs was smooth and the UI was responsive. Unfortunately, after some time I discovered that manipulating heavy graphs (like moving a layer) resulted in degraded performance. Rendering a singular layer into the bitmap wasn’t slower than in previous renderer, but scheduler fired less often, so it seemed like it was laggy.
The only logical solution left at that time, was to implement separate render thread.
…
Remember the part where I mentioned we use Avalonia’s GPU context and compositor? Yeah, to get a separate render thread I had to properly synchronize not only access to GPU API, but also render thread’s render loop with Avalonia’s compositor.
Sounds painful, huh?
Well, it was. After many days of freezes, crashes and debugging, it seemed to finally work. I developed it on a test project, but still.
◝(ᵔᗜᵔ)◜
Until I ran PixiEditor with it…
It worked like a hot mess…
(¬_¬“)
Rendering scheduling
Something had to be done, I think the whole rework already took me a full 2 weeks, where one whole week was dedicated to render thread. Shipping renderer that provides worse performance is unacceptable, even if it’s better in some scenarios.
At that point, I already invested so much time into this. I decided to give up separate render thread for now. However the whole point of the rework was to fix freezes and improve the performance.
So what now?
I got my shit together and facts straight.
> New rework solves laggy animation performance
> Manipulation performance is degraded due to background scheduler update rate
…
> Can’t I just fire rendering immediately when user manipulates the canvas and do background rendering for animation?
5 lines of code and problem solved.
🙈It doesn’t completely replace separate thread solution. It still runs on the main thread, but it’s already much better. At least according to my tests.
(to any brave soul, if you want to play around render thread solution I made, check the render-thread branch both for PixiEditor and src/Drawie)
GPU chunks and direct viewport rendering
This optimization is quite exciting for me. It’s only related to drawing/painting performance, but it’s been on my mind since the beginning of version 2.0.
PixiEditor uses chunks for layers. So instead of storing full resolution layer it only stores chunks that have something in them. For example, if you have a 1024x1024 document, one layer of this document consists of 4 chunks that are 256x256 each. If you only draw on one chunk, others won’t be stored in memory.
This system was developed for version 1.0 and lost its meaning during transition to 2.0. Due to the performance reasons we had to use intermediate, full resolution texture before drawing to the screen. Which kills any benefits of chunks.
Why did it work like that? Well, version 1.0 had CPU-only rendering, and CPU chunks were a leftover from 1.0. I tried making them GPU a while ago, but it had major problems back then.
Fortunately, I managed to properly implement GPU chunk textures, which significantly improves rendering performance. Thanks to this, I was able to get rid of intermediate surface and draw the chunks to the screen directly.
Direct screen rendering opens a possibility for another amazing optimization technique called occlusion culling. In the new renderer, PixiEditor will only draw chunks you see on the screen, if you zoom the viewport, chunks outside the visible area won’t be rendered.
Here’s a preview with shrunk visible area to see the effect
Furthermore, if you have a document with a graph, that consists of layers only, drawing shouldn’t allocate more memory than amount of chunks required. So creating huge documents by itself won’t cause memory problems for PixiEditor. Saving .pixi files will also save filled chunks only.
Please note that the new renderer is not yet released. It will require some more testing before it lands in the development version.
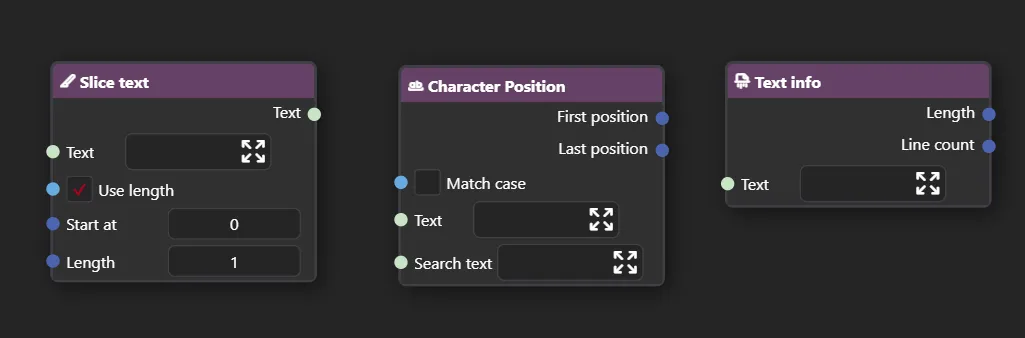
New Nodes
Slice Text, Character Position and Text Info
We’ve added a few new nodes for text manipulation.
And here’s a quick demo of what you can do with them
These are already in the development version (2.0.1.15-dev), so feel free to try them out!
Posterize
The Posterize node reduces the number of colors in an image, creating a stylized effect. It works by mapping the colors in the input image to a limited set of colors based on the specified number of levels.
We added a node for that. There are 2 modes available: RGB and Luminance. The latter will produce grayscale posterization.
What’s next?
We are still working on fixes and improvements after the 2.0 release along with a Brush Engine. Hopefully I’ll have more news about it in October status update.
Also, thanks to Sebasthem for letting us use a photo of this cute kitty!
Sebasthem’s Instagram
Thank you for reading, see you next month!